Saturday, April 23, 2011

Clue 6: Egypt II

Closing Egypt
Our Clue 6 completes the Egyptian leg of the trip. This is one of my favorite clues (I say that with all clues though!) because the Ladybug stitch (in our case, Scarab stitch) is such an elegant simple stitch, with such stunning results. Above in the photo is one of the test swatches I used for the pyramids, this one done in broken twisted rib. Your finished clue will have a view of the three overlapping pyramids - Khufu, Khafre and Menkaure, framed by the little scarabs. The interesting thing is that when you look at the finished clue, particularly in the square shawl, the final effect is quite different and very interesting. I would say this two clues give you a big bang for your buck.

Some of you had questions about whether or not to purl or to twist the WS/even rows of your shawl. The answer is, there is no right or wrong way to do it! If you are lagging behind in clue 5 and want a better idea of what to do, I made this little swatch:
 
(Note: instructions are for working back and forth)
Bottom: Twisted Rib stitch
R1 and 2: k1-tbl, p1-tbl repeated to the end
Middle: Half Twisted Rib stitch
R1: k1-tbl, p1
R2: k1, p1
Top: Broken Twisted Rib stitch
R1: k1-tbl, p1
R2: p all

As you can see, there are different levels of definition in the rib and an overall different feel with very little variation in the technique. For yarns that are darker and won't show the definition as well, you can just work a broken rib. Lighter yarns with sharper definition will show better in full twisted rib, but it really comes down to your own personal taste
This is a blocked sample; In the unblocked sample, twisted rib is a rather compact stitch and tends to pull the fabric, so you may have now a puckered appearance of the fabric. This will block nicely, opening the rib.

Super Swatch Hat

I received on the mail my order for MadTosh vintage in Cove color - a delightful blend of green-blues and browns that really make you think of a quiet cove with shallow waters.
And I have my Super Swatch started, and almost at the point where I need to decide on decreases to turn it into a hat
This is just the most lovely, squishiest yarn for cable knitting!
And I am happy to report that my original swatch measurement estimations were rather accurate. So the next step will be to write out the pattern with stitch counts and center the motifs, and I will be on my way to starting the actual coat. But first, I need to finish the hat.

Oliving la vida loca

What do you get when you mix a centennial olive tree and the balmy Arizona winter?
A backyard littered with several pounds of ripe, oily fruits every day
A really dirty child who loves to squish ripe olives
A stupid Border Collie obsessed with fetching the falling olives
And never ending pool cleaning fun for the husband!

Wyoming anybody?
It sounds like I will be going to Wheatland, WY for a few days in June for some training sessions. The place is just uninteresting enough that I won't be dragging the family, so that is me alone for the first time since the baby was born. Aside from a lot of knitting, I don't know what I am going to do with myself!
If any of you are from that area and want to point me in the direction of a nice yarn store, or just want to get together for a knit-in, give me a holler!

Wednesday, April 13, 2011

Clue 5: Egypt I

The Call of the Cashmere was answered
So here we are, in Egypt! Our heroes are peacefully gliding along the Suez Canal, a wonder of engineering in its time, on their way to the Indian subcontinent. As in every trip, some portions are peaceful and sedated, and even boring. Clue 5 is in itself pretty tame, but it does give you the opportunity to explore the look of different techniques for twisted stitches and twisted ribs. A full twisted rib, with all stitches twisted in every row, gives a sharp definition, while twisting every other row but keeping the ribbing gives a slightly subtler appearance. Finally, twisting and ribbing only the RS (or odd) rows/rounds but working all the WS/even rows plain gives a "broken rib" appearance, with just a little definition, and a more pebbly appearance that is in itself quite attractive as well.
Up to now I have worked a different version of clue 5 in each of my shawls, and I like them all. Of course, I have the advantage of having clue 6 added as well, so I can admire the final look!
Just to make things harder on myself, I have started a fourth shawl, using the Winter Thaw Hedgehog Fibers cashmere. I swear I could just hear it cry at night, feeling lonely and abandoned, after going through so much trouble to get it here all the way from Ireland. I just can't stand to see a good fiber cry. So it is up to clue 4, and I will pace you all with this one.
It is great fun to see the shawl in all its versions - the lofty, plump, wintry cashmere and the fine, tightly plied silk with gold beads are like the winter and summer versions of the shawl. The other two, a very fine ivory cash/wool and the moody purple/grey cash/silk, are like the bride/widow version, LOL. In fact, I am considering selling the finished white one as a bridal veil when I am done!

Mom Coat Update


My order of MadTosh Vintage arrived from Eat Sleep Knit. The color is called Bark, and it is a warmer color of brown with gold highlights than my photo. The yarn is very squishy and very tightly plied, and the stitch definition is out of this world. I think I have found my favorite yarn for cable knitting!
Here are some pictures of the swatches I will  be using:


Though the larger cable panel needs a little reworking with the spacing, the rest is pretty well set. The swatches, by the way, are not the original stitch patterns used in the original design, but some variations thereof; For instance, the cable was just a twist stitch pattern that I did not think had enough depth.
After a thorough read of the pattern, calculator in hand, I realized that the original coat is huge; In fact, it has over 8 inches of ease at the chest for my mom's size. This is in part to accommodate the lining that was sewn in, but also it is really made to be an outer coat worn over a full suit. The photo in the mag cover (which is also the only photo of the coat) glosses this very cleverly with a good modelling pose. There are also a number of other problems in the pattern, such as an odd shaping of the sleeve cap, and a complete and utter disregard for stitch counts.
On the good side, this totally bypasses the issue of copyright, since I won't use ANY of the original instructions.
So I poured myself a really large cup of coffee and took out my Shirley Paden Knitwear Design Workshop, and a few hours later had a pretty decent initial schematic. That, and the sketches, are the tools I need to do a complete rewrite of the pattern.
At this point I thank my lucky stars for all the work I put into designing Joe's sweater. Designing aran styles is a bit different than designing other sweaters because cables alter the size so much. So good swatches are of the essence.
My next step is to make a Master Swatch - a large swatch placing all the individual stitches together, in approximately the same sequence and size that they will have in the finished sweater. Elizabeth Zimmerman in her wisdom recommends to make a hat-swatch (waste not!), which is a great idea, and I went ahead and ordered a few more skeins of Vintage, two in the Bark (because I always fret about not having enough yarn) and two in a color called Cove, which is exactly the color of Joe's eyes (a bit blue, a bit green). And I will make my hat-swatch with the Cove.
Next step is, to write an outline of the full pattern with all the increases and decreases figured out, and then I can get to work.
For now I am pondering the eternal question: Side seams or no side seams?

Miscellaneous knits...
I am actually making some progress in the belted shell! I had to do a lot of pattern figuring here too, because it seems to be sized for ladies with big shoulders and narrow waists, which is clearly the opposite of my size (nice Mediterranean hips and narrow little shoulders). Making 59 inches of narrow garter stitch band was as close to knitting punishment as it can get for me, but once the stitches were all picked out, I was up to some speed. So speedy, in fact, that I did not notice I have made a big boo-boo : I was supposed to join on the round at 3 inches from the bottom, but I waited until 3 inches from the beginning of the band. A 2 inch mistake. Ouch. However, I will wait until it is all done and seam the extra 1-2 inches after I make sure I can actually get it over my hips.


One last word of caution: do NOT go over to Trish Moon's website. She is an evil woman. She knows I really don't want to buy any more silk, but she put on such a terrific sale of her natural-dyed silk I just had to get two more. Aw. I have no willpower.

Tuesday, April 5, 2011

Out of the cocoon


 Or How to Block Your Shawl
The process of blocking a garment resembles the butterfly emerging from the cocoon: It is a wonder that the ugly little shriveled creature transforms in a creature of such beauty.
And now you can see it all happen here, at the Pond :)

Materials
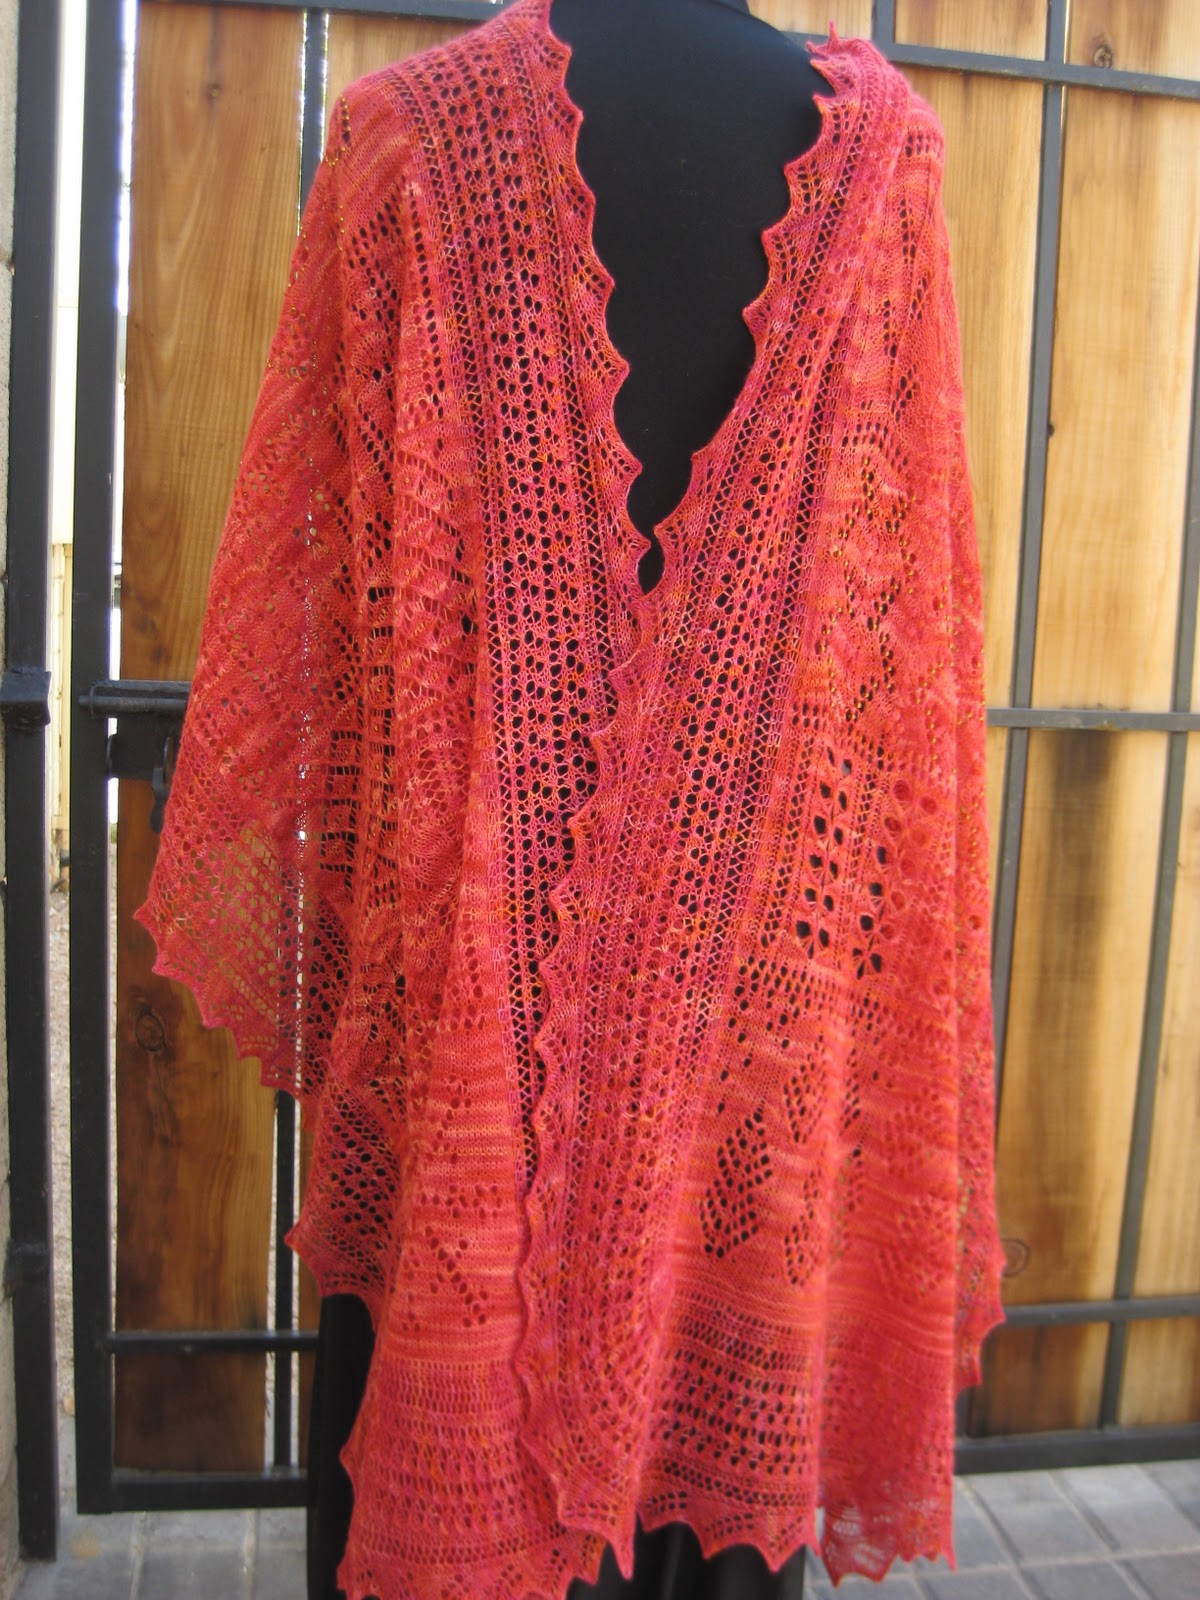
One finished 2010 KAL scarf such as the one shown above
Eucalan or a similar wool wash (plain water if the garment is quite clean)
A couple of dry towels
Your favorite blocking surface. Until I bought some kiddy foam floor tiles, I was using the floor carpeting or the guest bedroom bed.
Blocking wires. Not necessary but they are really handy for pointy edges
A box, or two, or three of stainless steel T-pins
A free afternoon. No kids or pets around. Even better, no husband so you may cuss freely
Another knitting project to work during the waiting periods
Lots of chocolate to fortify yourself.

Procedure:
First is a beauty bath in Eucalan and tepid water. Let soak for an hour or two
Lay flat in a dry towel, or two towels if it is a big project
Roll the towels with the shawl inside like a big shawl burrito.
so now we have an appropriately wet, but not dripping wet, garment. In humid climates you won't have a problem, in dry Arizona you have to be a VERY quick blocker or the lace will almost dry before you are done pinning it!
While you wait, shoo the family away, lay your materials and break open the chocolate

Blocking wires are handy with pointy edges
Once the extra water is soaked out into the towels, lie the shawl flat on your blocking surface. If you have blocking pins, thread them through the tips of the peaks that the edge forms. If you don't, well, I may have to make another tutorial. A variety of materials, such as washed piano wires and heavy fishing lines, will work out well.
Do not thread the wires all the way to the edges, which tend to be rounded and not sharply square
You can use marker lines, tape, or plain old eye to make your edges straight
Now is the fun part: once you have threaded all the edge, start pinning it down using the T-pins to hold the wire in place. Place just a few pins far apart and pull each side to open the lace. The right amount of tension is that which opens the lace well without damaging the yarn. Usually, the yarn can take a lot more tension than you think, and a lace piece typically grows 30% of its unblocked size during the blocking process
Last pin the edges in a rounded fashion with T-pins
The cycle of  stretching, pinning, stepping back to admire the effect, cussing, unpinning and stretching again can be repeated several times until you are happy with the results.
You may now leave the shawl to dry and either finish the chocolate or pour yourself a stiff drink, if your hands don't shake.
And next morning (or in a couple of days if you don't live in Arizona), your hard work will be rewarded. Unpin and admire your gorgeous new shawl.
Can you believe how much larger it is?


How gossamer...

A detail of the corner. The bunching of the joins is smoothed

The wide edge

I loathe the process, but I never get tired of the results!

A postcard from the Middle Ages
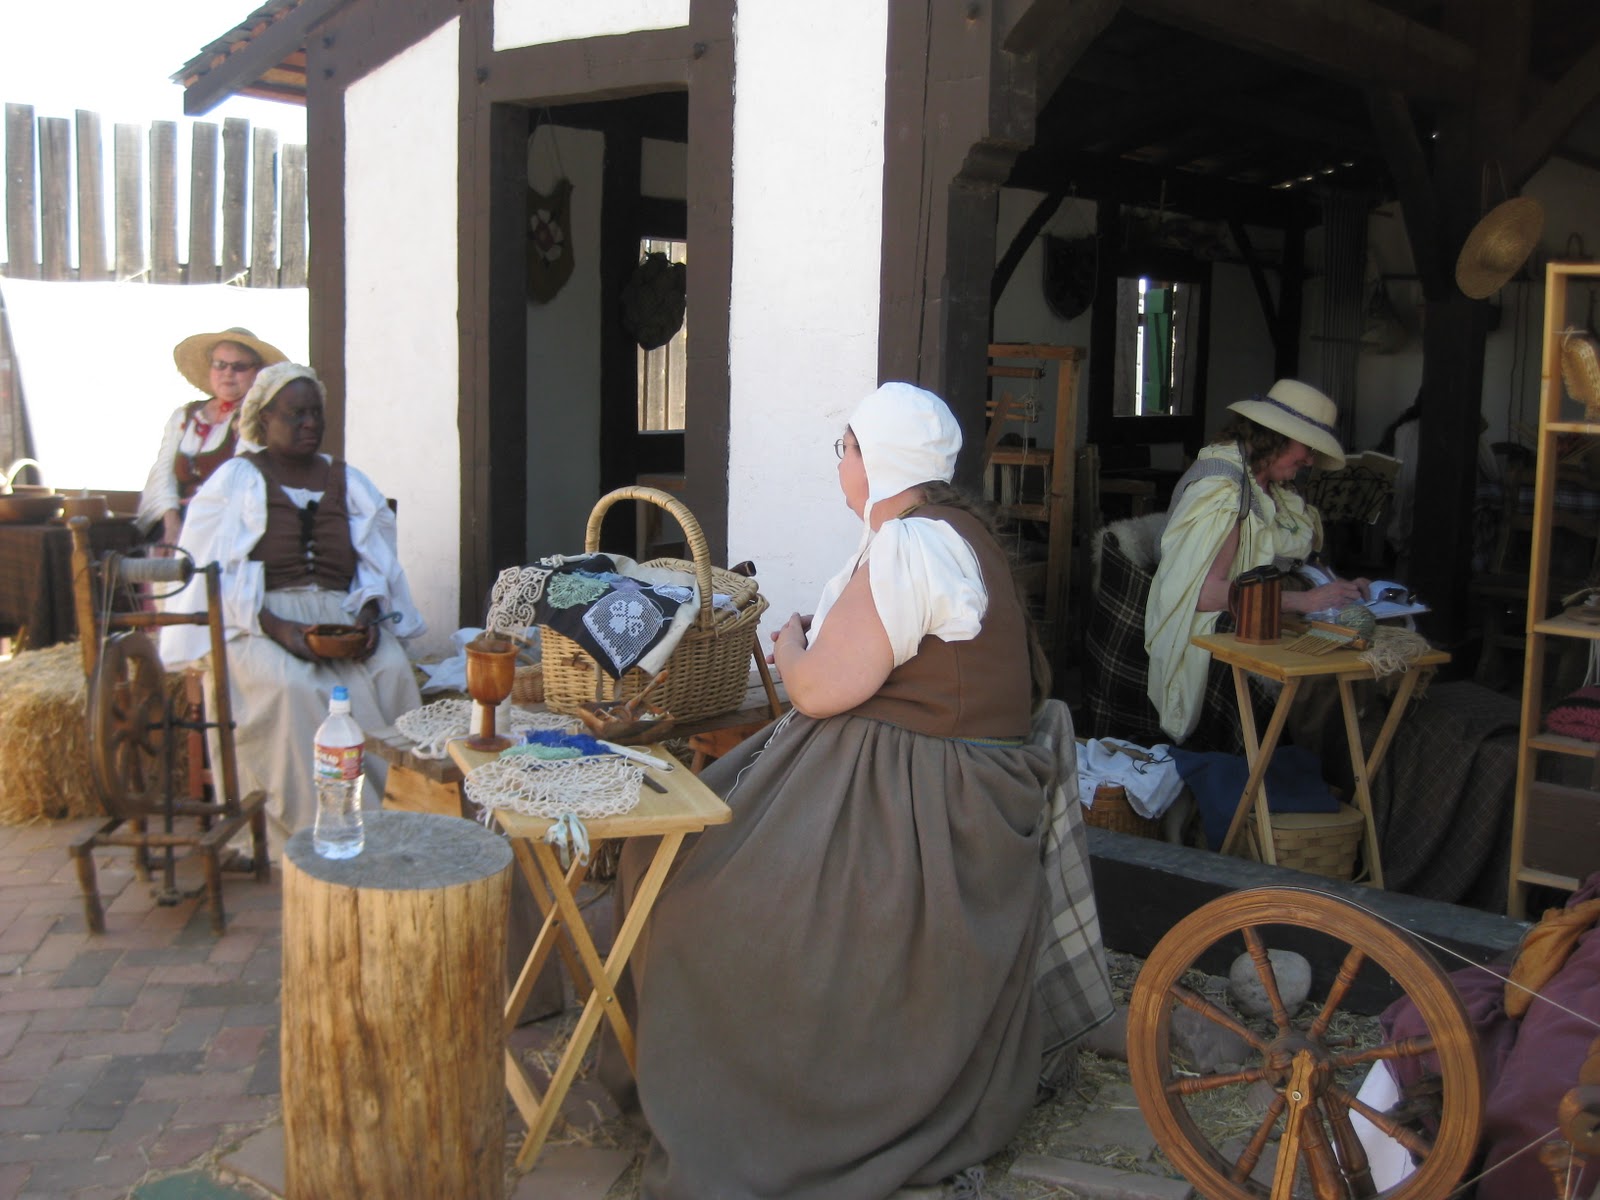
For those that are not from Around Here, the Americans call Renaissance Fair to a vaguely medieval festival that travels around the country. It is an excuse to get dressed in clothes that encompass medieval wenches, knights, witches, kings and queens, faeries, jugglers as well as not-so-medieval pirates and even some actual Renaissance folks. There are themed craft stalls, deep friend foods, giant turkey legs, low key rides, tomato throwing at insult spewing folk, knit jousting, fire eating and belly dancers. You can buy anything from love potions to faerie wings to real swords and halberds.
We were there last weekend.
Pots and cauldrons, I am happy there are dishwashers nowadays
Decidedly un-medieval kiddie rides. You know I am saving this picture for when he has his first girlfriend

Calvin had to be rescued from the piggy pen
Lookie here! Medieval lace knitting!!!
Medieval spinning! Tatting! Crocheting!
Yes, it was as hard to pull me away from the craft booth as it was to pull my son away from the bunnies and piggies. It was all in good fun.

Blast from the Past
My mom never asks me to knit her anything, though she seems to enjoy my knitted gifts. So when she recently asked me to knit her a coat she had seen in a magazine, I was happy to oblige. However...
The magazine is a 1964 issue of Labores del Hogar, a venerable Spanish publication. And the coat is this cabled coat in the front. I have to admit it is a great vintage look!
One quick glance to the instructions and I had a new found admiration for the knitters of way back when. The instructions are a mash of tiny letters in a centerfold page that opens as big as a tablecloth. There are no charts, no schematics, no sizes. No yardage estimates. Some of the instructions are pretty cryptic and assume you will guess what they mean  (such as "cross 2 stitches" for a cable - without mentioning direction). Thank God, there was a gauge.
After laboring all morning, I have primitive schematics, I have charted the stitches and figured out the yardage very roughly.

I am willing to do all this, except for one thing: I will not knit the thing in white or grey as she requested. If this is going to take me this long, it better be a statement piece.
I briefly considered using Malabrigo Worsted but after seeing how hard it is to get this much yardage of the same color together, I discarded the idea I really would have loved to use Stonechat, but it seems to pool horribly!. After much yarn surfing, my choice is Madelinetosh Vintage. Subtle tonal color, great stitch definition, we will see how the gauge goes. I love MadTosh yarns, but they tend to be on the thin side. The color? I went for Bark - lovely dimensional brown and gold, I just loved the pictures of finished projects in Ravelry, but still quite wearable.
Anybody cares to join?
See you soon in Egypt
The Egypt section of the shawl is divided between two clues. The first one is due on 4/9, the second one two weeks later. I am going to guess that it is not going to be as well loved as clue 3 and 4, but it is a short and manageable clue that introduces some interesting skill for newbies and some room for personalization. It does not seem like much, but once clue 6 is added, the effect is just gorgeous.
So saddle your camels, tie your sandals, and see you there.