Thursday, December 30, 2010

Winterchild

Did you have a wonderful Christmas? We did! Though it was very intimate and quiet, just the four of us. Our families all live far away, and my work schedule did not permit any travelling. But it was fun nevertheless.

Baby Calvin turned two. Having a birthday just before Christmas is a bummer, but he is too little to care, yet.
There was a Sponge Bob ice cream cake, after all

It was much enjoyed. All over the table, the floor,  and the kid.   
 And then of course, the Big Show! Christmas Day is so much more fun with two little kids around.

Presents under the tree! now we are talking

Yahoo! what a loot

a happy customer, hoarding his toys

Three hours of wrapping, gone in minutes

I got the sweetest Christmas gift too! A bottle of perfume engraved with a very sweet message from my husband, and a DRESSFORM! yahoo! It just melts my heart to think of my husband calling sewing stores trying to get the thing.Of course, I got him a tool chest, and I am like a fish out of water in a hardware store, so we are even.  So now, I have no excuse to try and design a woman's sweater.

Incredibly, my year end's plan for knitting was almost realized. A couple of secret projects done, gone, and waiting to be published. The 2010 Kalendar done in time! and so many gorgeous pictures cropping up of your finished projects! I am so proud of what we have all achieved. And... Winterchild finished! And I can't resist showing it off on the new dress form
Here it is, pre-blocking

DH found these extra-large, well priced mats at Home Depot

Here it is - all blocked

A triangle drape

here showing the square shape better


A detail of the pattern

I have gathered a nice group of testers, and the pattern is off to Kate the tech editor, and now I have to manage some beautiful photographs, and it will be in the KnitPicks IDP site very soon. I enjoyed working with their Shimmer Alpaca-Silk blend lace yarn once more, it feels luxurious, it has a beautiful sheen and feel. DH is working on making me a little table-top studio, to see if we can improve the quality of the photography. He is such a gem.

Of course, right now I am suffering from the post project blues. Sometimes, after powering through a big project or two, I feel drained. So yesterday I went on a pointless shopping expedition, which is usually a great pick-me-up.
First, to the bookstore - I got a copy of Wrapped in Lace, and I almost read it cover to cover sitting at the Starbucks inside B&N. What a lovely book. I felt immediate kinship with Margaret Stove's creative journey through lace. I wish I could create such lovely, perfect gems as she has.

And also, a copy of this. It has been a long time since I have read it, so I thought I would do the homework to get my inspiration together! I wanted a hard copy I could earmark, make notes and put tabs on. After the first two chapters, I found myself remembering how much I have loved Verne's books as a child. If you want to read it too, the book is available as part of the Creative Commons, and free in the web in a number of free pdf's formats. Here is one, from U of Philadelphia. So now you don't have an excuse not to read along!

Then, to the yarn shop... of course! To show off Winterchild. And I could not escape without a copy of Barbara Walker's Knitting from the Top , since I fully intend to design a woman's sweater some time in the future. Always an excuse to get another book.

And yes, yarn. I promised to myself I would not buy any, but I had promised my sister a hat months ago, after her favorite Urchin started to fall apart. And conveniently, they had some Yak/cormo blend yarn in natural hues that was to die for! After a quick Rav search for a pattern that suited my sister, I settled for Louisa by Kristi Pedersen, which not only uses the same hues, and same gauge, but it just looks like it is made for my sister.

The first few rows form a knitted Latvian braid, a technique used in many Nordic style patterns, which is fun (but slow) to make and quite lovely. I expect that I will need a couple of quick, fun projects to get over the whole shawl blues. Hats, mitts and socks, here I go!

And of course, expect to hear more about the 2011 Kalendar soon, as I start drawing inspiration from the book, and swatching, lots of swatching.

My new year's resolutions?
To give you all a lovely 2011 Kalendar to treasure
To design a woman's sweater
To get off my chest a couple of other small designs (shawlettes, mostly)
Once more, to clean off my WIP drawer
To do a better job of keeping in contact with my friends.
And to lose 10 lbs and exercise more. This one is a bonus and i would not hold my breath.
Have a great 2011 everybody!


Wednesday, December 15, 2010

Nearly Christmas! O-o

It's Beginning to Look a Lot Like Christmas...

Or at least as much like Christmas as it can look in sunny Phoenix. We try our best. Our tree may be lacking snow and tinsel, which we discovered causes tummy upset in children and dogs alike. The tree decorations only reach the middle third of the tree, or as high as our youngest child can reach. I am looking forward to have a tree with decorations all the way to the bottom (about as much as I am looking forward to a full, hot, uninterrupted meal).

Now, at least, when I sit in my breakfast nook, I can see a winter landscape complete with trees, snowflakes and happy sledders. Courtesy of Crayola and my husband's creativity. The children helped (those are the smudges in the snow at the bottom) and they had a great time with it. I love it! Cheap. Fun. Washable.
Less than 10 shopping days left!
And I am all done (I think)! Our Christmas list is woefully short, since the in-law side of the family decided not to exchange gifts. The boy's gifts were a matter of a crazy morning at Toys R Us. The most difficult part, however, has always been my family. They have everything. They live in Spain. Shipping anything is a nightmare, it can't be breakable, it can't have smelly chemicals or they'll tear your package apart, and it costs a song to mail anything - No cookies and fudge are possibly worth $200 worth of shipping.
So this year I thought I was smart by buying stuff online in shops located in Spain, I could actually invest more on the gift itself, save on shipping and have it delivered before Spring. I was wrong. It sucked. For some reason, online stores in Spain are not really prepared to sell to customers outside the EU. You have to register to buy (name, password, the whole kit and kaboodle). You absolutely need a National ID number to buy (I have an outdated one, since I haven't lived there in 20+ years). You can't enter an address outside a few choice countries (which include Lithuania and Turkey and a smattering of EU countries but not USA). So I used my parent's address. You can't choose shipping method, so they smack  you about 10 euros for same-day shipping, whether you want it or not. They charge you VAT, somewhere between 15-20%, with no option out. And once you use paypal (I resisted entering my credit card info after all that), you can't enter a shipping address outside USA so go figure. After I finished shopping, I felt like I have committed some kind of felony. My request definitely must look like an illegal one, so I better call the store and clarify that I just want to buy my sister an electronic gadget for Christmas and no, I can't send one from USA for a variety of reasons. Wish me luck. Spain is not famous for its customer friendliness.

Winterchild progress report
Last year, I was smart. I started early and knitted gifts for all my family; This year, I had four patterns on deadline. My little Christmas miracle is that three of them are done on time. Child sweater in process of being edited, to be released who knows when; our beloved KAL clues all done though not completely finished yet; The socks, safely home with the editor for photography and editing.
Just this guy to finish. And guess what, I am out of yarn. Miscalculated again!

It is more that I changed my mind half way through it, and decided to make the shawl a whole 25% longer and wider, changed the center design, changed the edge...

Now we are looking at a shawl/wrap/baby blankie about 50x35 in size. It is a very versatile size and a pattern that manages to look much more difficult than what it is... and not a purl in sight!
Hopefully I will be done with the writing very shortly and looking for testers. So if you have a special one you want to make a shawl, wrap, prayer shawl, crib blanket for, and you like the design, let me know.

What is coming next?
2011 Edition Mystery Shawl.
I am not sure of the what, how and when, but I have an idea of the What About. Here are a couple of links to chew on:
Getting any ideas? Suggestions?

Photo Contest for the 2010 KAL.
Once the Christmas wraps up, we will again request pictures of your finished clues to include in the compiled pattern for the 2010 shawl... and also pictures of the finished shawl for the pattern and the Rav page! you will be credited, and a nice price will be raffled among the entries... Maybe yarn to get your 2011 shawl going? A nice set of needles? A project bag? I am open to suggestions.

A couple more shawls, baby sweaters, hats...
This has been an exhausting end of the year for me. Knitting on schedule almost takes the fun out of knitting. In the next year, I want to recapture the joy of working on fun projects at my own pace. I have a couple of experimental children in the sketch books and I can't wait to clean up my WIP drawer again to set to work on swatching for them. There are two lovely small shawlettes that are calling me like the mermaids to Ulysses, and a couple of fun and quick colorwork projects. I really hope you will tag along for the journey; Your comments on Cliffrose made a dramatic difference on how I saw and developed the shawl.

And just for giggles... my bumper crop
I am sorry, I just HAVE to brag. You know how Knitspot's Anne Henson is always showing off her amazing garden vegetables. I am so jealous of her. I have the worse black thumb this side of the Mississippi (and THAT side too). This year however, the DH installed dogproof sprinklers in a previously dry part of the yard, and unexpectedly, the elderly dwarf orange tree grew so many oranges we don't even know what to do with them.
This tree is just as tall as I am, and yet it has produced a sackful of oranges!. Next to it is an equally dwarf lemon tree which is also starting to stir.

I mean... six baskets of oranges, and still fruit on the tree???
Three things I discovered: 1 - Orange juice uses up a lot of orange, so it is the preferred method to deal with the abundance. 2- It is too much damn work to squeeze oranges by hand. 3- Organic freshly squeezed orange juice is SO good it almost makes you forget how much damn work it is.

Sunday, November 28, 2010

Part Four: Calculate your Edge Repeats

My border is moving at glacier speed, when some of you are finishing your shawls. I am absolutely delighted to see the first pictures of finished shawls turn up, even without a border, and it looks absolutely beautiful - delicate and intricate but not too heavy.

In my defense, my work schedule has been a nightmare, and there is a couple of knitterly things to blame

Culprit #1, the spring socks
Since I can't post pictures, I will post the left over yarn balls... 2 pairs done, with one just needing to have the tip frogged and reworked. I have a group of intrepid testers at Ravelry doing their best to weed out my many mistakes to turn this into a flawless pattern worthy of your yarn. And it is turning out to be quite a workout!


Culprit #2, the baby wrap/mother wrap
I got a couple of skeins of Shimmer in snowy white, "bare" version for this. I had made my wedding shawl out of this and it is the most lovely, soft yarn with a gorgeous sheen. This is going to be a squarish lace wrap with a snowflake theme, in garter stitch both in the center panel and the edge, and therefore reversible. I have a few friends in their way to become moms, and I thought it would be fun to have a wrap that looks delicate enough to use in christening but also use as a scarf/shawlette that mom can use. Babies are very non appreciative of fine lace work. The lace is absolutely easy to work, yet looks difficult.
The wrap has been done up to a half of the center panel, frogged completely, and now I am about up there again. I wish I had time to frog once more to add a few refinements, but it is nothing that would kill me if I let them be there, so I have to exchange deadline for utter perfection.

Don't you love the drab look of unblocked lace? You all recognize this guy, right? Galina Khmeleva's gorgeous fat snowflake. It is the main show. Geez, you could ALL have designed this shawl!
The working name is Winterchild, but that can change... I will keep you posted in the progress

Back to the border...
So you all remember where we left off... Here is a small schematic of a border. Side A (cast on) and side B (selvedge) with the corners. The trick now is to figure out how many joints to make at the corners that will allow you to have a whole number of repeats of the edge, so when you come all the way round to the starting point, both sides can be grafted seamlessly.

Remember that...
A single join needs 2 rows of edge border (one RS and one WS)
A double join needs 4 rowsof edge border
A triple join needs 6 rows of edge border.

A medium edge (such as our Aspen Leaf) needs 6-8 double joins and 1 triple to turn the corners. Those will be distributed along the A and the B sides, with the triple joins towards the center.

Go ahead, take a pencil, download the worksheet at the Fancy Schmancy Dishcloth site and jot down the numbers for your dishcloth (there is no full pattern yet - only the worksheet).
For instance, on my initial dishcloth square, I casted on 29 stitches (so total side A is 29) and did 54 rows (total, 54/2 = 27 garter ridges on the selvedge).
I usually calculate the joins only over one side A and one B, which is half of the pattern, and then just double the numbers.
For my dishcloth, I am going to use 3 DJ on the B side, and in the A side, one TJ, and 3 more DJ, with the TJ between the two groups of DJ.  This of course will be mirrored on the second corner.
So for side A I will have: 3 x2 = 6 DJ, 1x2 = 2 TJ, and the remaining 29-(6+2) = 21 stitches will have a single join.
On the B side, I will have 3x2 = 6 DJ, no TJ, and the remaining 27-6= 21 picked-up stitches will have a single join.

Added together, we have 2 TJ, 12 DJ and 42 SJ.
The number of edge rows needed for all those joins is : (2x6) + (12x4) + (42x2) = 144 joins for half a pattern, 288 for a whole one.
Our chosen edge has 12-rows repeat. 144 rows needed divided by 12 rows per repeat = 12 repeats.

We are in luck, and our initial calculations yielded a whole number, no decimals, which means we will have 12 x 2 = 24 exact repeats by the time we finish the edge and we can happily graft without further ado.

Let's say, instead, that I have cast on 28 st x 54 rows (one stitch difference). Our numbers would change a little. Using the same number of joins, we will need (2x6)+ (12x4) + (41x2 - one less stitch) = 142 rows.
This will give us a repeat count of 142\12 = 11.8. No exact count. What to do now?
Calculate the number of rows needed for the closest whole numbers:
For 11 repeats, we need 11x12 = 132 rows, which is 10 rows less. We could convert 5 double joins to a single, but then our corner may be a bit too tight and not turn well. But it is an option.
For 12 repeats, we need 12x12= 144 rows, 2 rows short. In this case, the decision is easy: convert one single to a double join somewhere and we will have an exact number.

Other options include changing the number of double or triple joins at the edges, and part of the decision will hinge on how well you are turning the corner with the chosen number of multiple joins for the edge.

So, in the case of our first dishcloth with the exact number of joins, you would start at the left side, a few stitches above the left-lower corner. Work your way picking up stitches along to 3 stitches below the left-upper corner. Work 3 DJ. Take now the stitches on the upper side "A" out of the holder and into the needle, work 1 TJ and 3 DJ. Continue single joins until 4 stitches before the end, then do 3 DJ and 1 TJ. You are done with the first side A. Pick up stitches along the right side selvedge, do 3 DJ, and continue all SJ towards the right, lower corner. Do 3 DJ, and now you are into the cast on side. Remove stitches from the provisional cast on into the needle, do a TJ and DJ, and keep working SJ until you get to the left, lower corner. Stop at 4 stitches before the end.

Now it is a good moment to make sure you have counted your repeats well. Mistakes happen, so count the remaining number of stitches left, calculate how many rows you need, and see if you will indeed be finishing with an exact repeat. If you lost or gained joins somewhere (hey, it is easy to overlook a stitch on the selvedge), adjust your counts here -you may have to add or eliminate a double join. Finish turning the last corner, and now you are, hopefully, ready to graft and finish... which will be our last issue!

In the case of the second dishcloth, where only an extra join needed to be added, do it at the last corner. If  you need to add multiple joins, distribute them evenly around the edge - preferably a the borders, but you can also throw the occasional extra double join in the straight parts. This is true specially on larger shawls with wide edges or with large repeats where adjusting the count may be more tricky.

Do you feel ready? The edge instructions are now almost written and will be out to the tech editor as soon as I can. Those instructions will just be straight for the shawl done as per instructions, using the narrow and the wide border, with the calculations all done already. If you modified the shawl, download the worksheet, take a pencil and eraser and download the worksheet... and good luck!


Saturday, November 20, 2010

Edge tutorial, part 3: Making Joins

Last week, I was visited by the worst attack of laryngitis I remember ever having. I lost my voice completely, and if any of you ever met me in person, that is a great personal tragedy. I am a qualified chatterbox. What is worse, my work requires that I talk a LOT and with a lot of people, that I dictate over the phone, and that was simply not possible. I got through with a lot of help from my coworkers, and a lot of apologies, and a lot of explanations to the people that thought I was going to give them some evil disease by talking in their general direction. I sounded worse that I felt, but I did not feel too well either. Thankfully, I just sound midly froggy now (never-froggy, heehee) but I still have a nasty cough every once in a while.
So that is my pitiful excuse for being horribly behind on my edge tutorials!
So, without further ado, let's go to part 3: how to make joins.

Written instructions for the border pattern 

 It seems a fair amount of you had trouble reading the written instructions at the bottom of the chart for the pattern, so here are true-blue written instructions:
R1 (RS):  Sl WYIB, p1, k1, yo, k2tog, p1, yo, k1, yo, k2, k2tog (12 st).
R2 (WS): p6, k2, yo, k2tog, k1, ktbl together with a border stitch (J).
R3: Sl WYIB, p1, k1, yo, k2tog, p1, k1, yo, k1, yo, k2, k2tog (13 st).
R4: p7, k2, yo, k2tog, k1, J.
R5: Sl WYIB, p1, k1, yo, k2tog, p1, k2, yo, k1, yo, k2, k2tog (14 st).
R6: p8, k2, yo, k2tog, k1, J.
R7: Sl WYIB, p1, k1, yo, k2tog, p1, k3, yo, k1, yo, k2, k2tog (15 st).
R8: p9, k2, yo, k2tog, k1, J.
R9: Sl WYIB, p1, k1, yo, k2tog, p1, k4, yo, k1, yo, k2, k2tog (16 st).
R10: p10, k2, yo, k2tog, k1, J.
R11: Sl WYIB, p1, k1, yo, k2tog, p1, k8, k2tog (15 st).
R12: p2, pass first stitch over second to cast it off, cast off the following 3 stitches, p4, k2, yo, k2tog, k1, J. (11 st)

Anatomy of an edge (yes it is obvious but necessary)
 This magnificent pictorial shows the different parts of a edged piece. First, we have the center panel, which is the finished dishcloth or shawl or blankie or whatever piece we want to edge.
Side A is (are) the cast on and cast off borders, and our edge stitches will attach to each of the cast on/off stitches. Our stitch/join count will be whatever our cast on/off count was.
Side B are the selvedges, and our  edge stitches will attach to stitches picked up from the selvedge. Many shawls will have a garter stitch selvedge, which makes it very simple to pick up stitches. You will pick up one stitch every 2 rows (= each garter ridge), and therefore your stitch/join count will be one half of the total row count.
Corners (C) share a few stitches from side B and a few from side A where the center panel stitches will be joined to the edge more than once (2 times = double join or 3 times = triple join) to achieve the turn of the corner. How many stitches are needed is a function of the width of the edge and your own preference.

Let's begin and leave the math for later
 Here is what you need: 
- Your little center piece, where you will place a marker show the right side (obvious when you have a pattern, but not so obvious with garter. (*although this is of little consequence on a garter dishcloth, you want to learn to do this so the right side of the edge aligns with the right side of the center piece for mostly everything else! nothing worse than realizing you have the sides wrong after a few repeats).
- Your needles. I prefer DPNs because they don't tangle and it is easy to pick up stitches on either end.
- Your yarn, duh!
- We are going to place a second marker along the left side, about 6-7 garter ridges above the bottom edge (here an orange locking marker)

We will begin our border at the left edge marker, and proceed clockwise. We do not begin at the very tip of the corner because it would make finishing more messy, and we need a little room in case we need to adjust our stitch count.


Pick up a few stitches above our start mark. As you can see, we pick up the garter "bumps" on the side. One stitch per bump, (=one stitch per garter ridge, which equals one stitch per 2 rows of the center panel). In a small piece like this you could pick up all the side stitches, but for a large piece you don't want to do that - just pick up a few, and when those are gone, pick up more as you go.


Using your favorite provisional cast on, cast on 11 stitches on a second needle. Here I am using the "blind" method


Knit the first row (R1) of the pattern using the needle with all the stitches picked up as your right side needle, and the end closest to the bottom end (the start mark). Do NOT slip the first stitch, just this one time. When you finish, your stitches will be sitting on the needle next to the picked up ones.


ktog-tbl one edge and one selvedge stitch
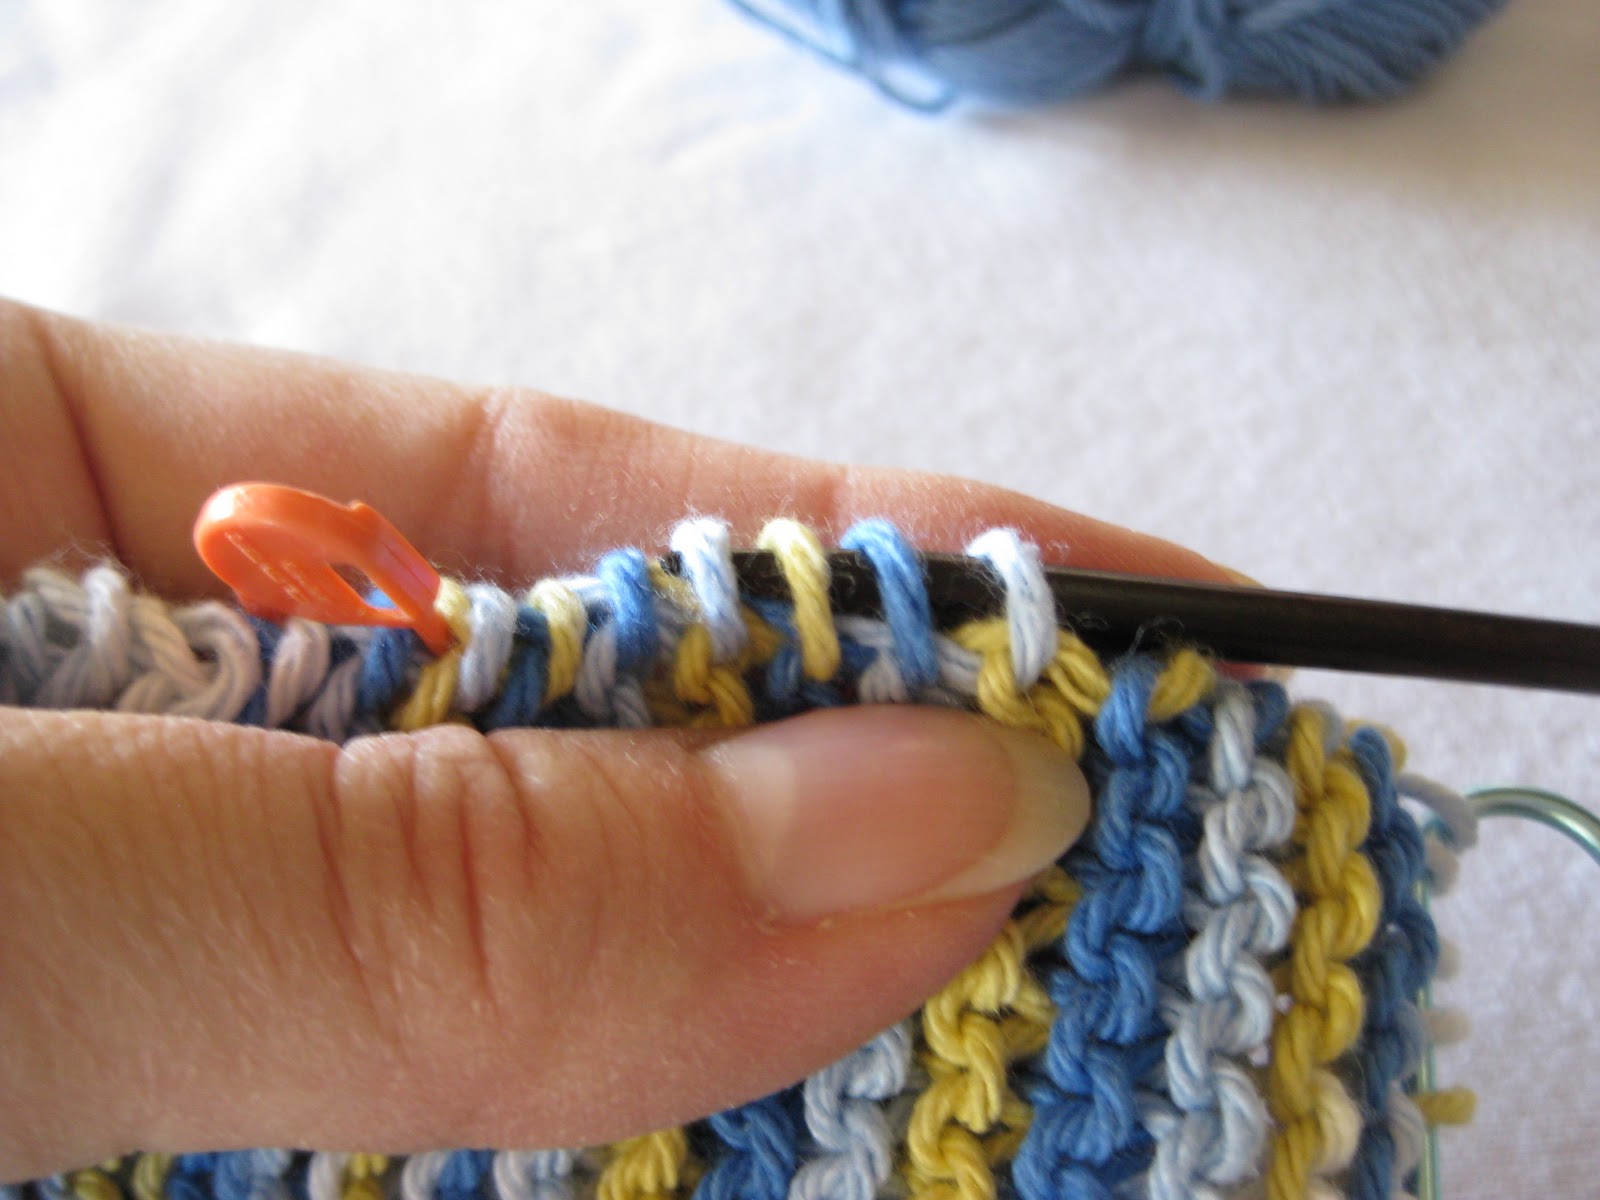
Now knit the second row (R2, which is a WS row). Your RS marker should be in the side of the work facing out. When you arrive to the last stitch of the edge, knit it together through the back loop with the first stitch picked up from the edge:
Here is another view
You have just worked a Single Join.
You will continue working through the edge pattern, making a Single Join at the end of each WS row. This will consume one selvedge stitch each time and will attach your border as you go seamlessly.
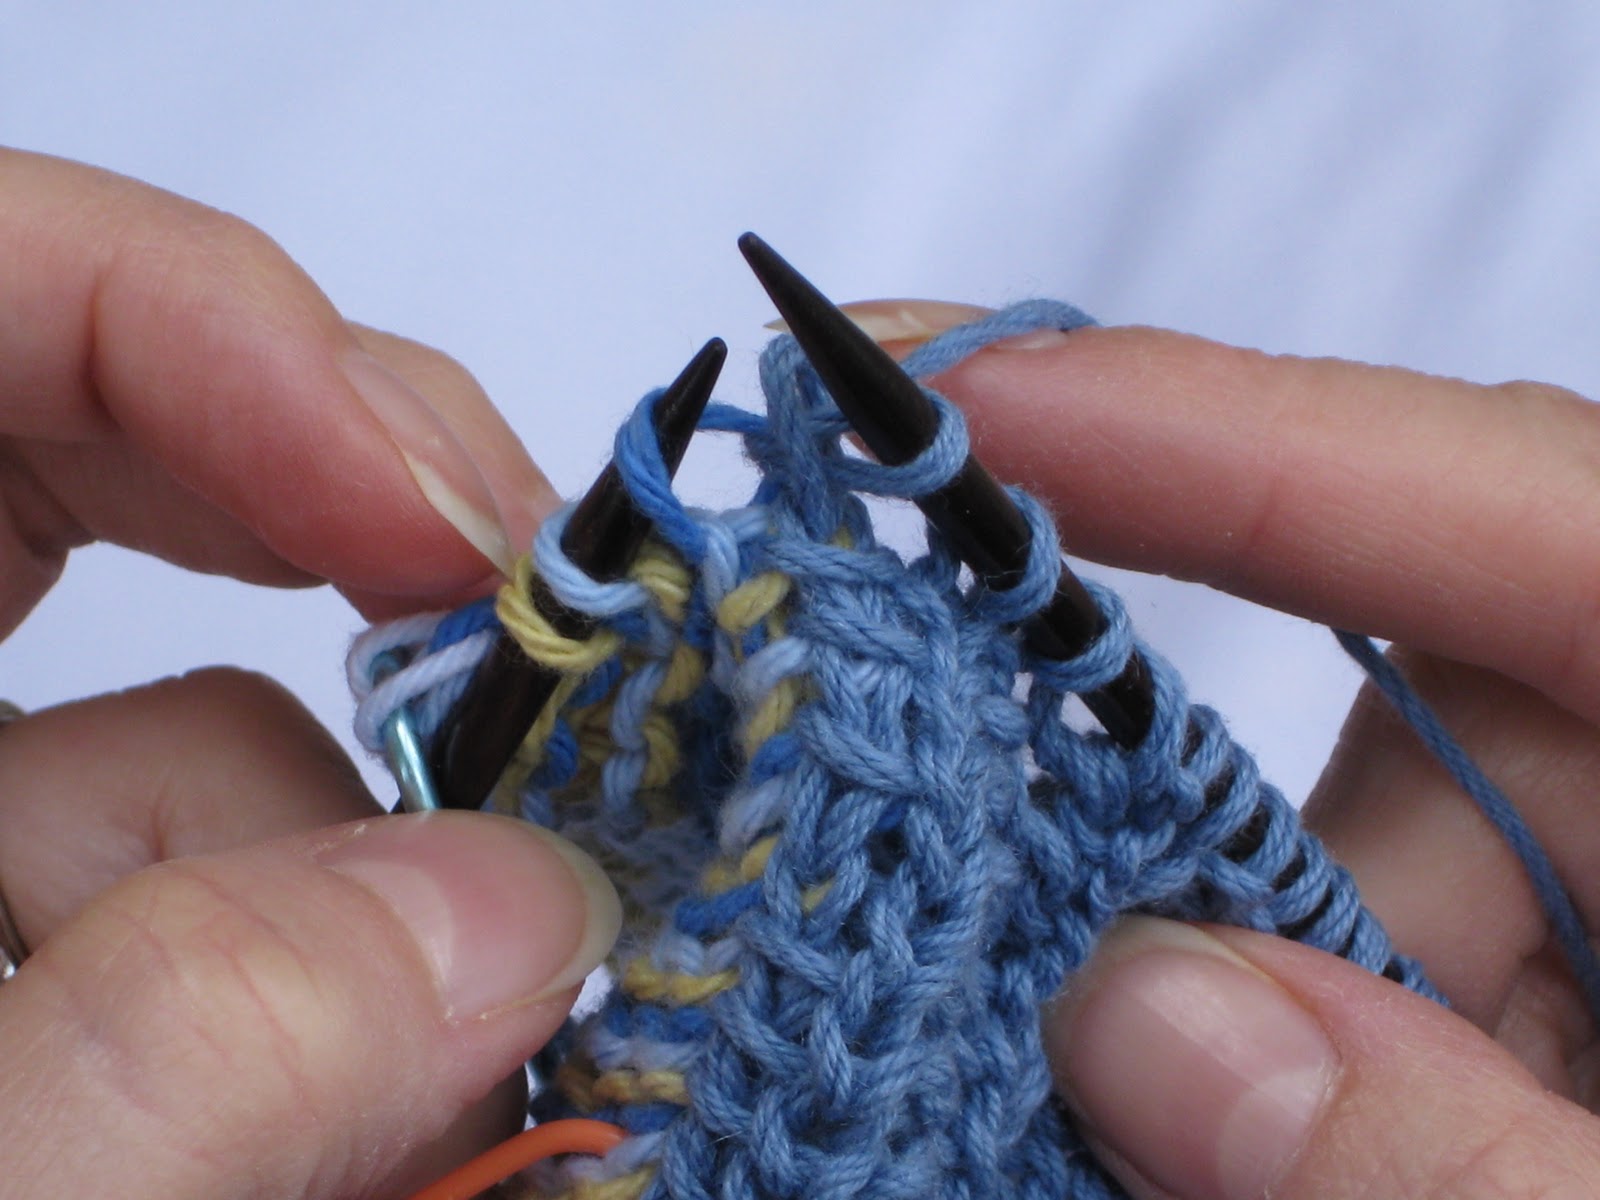
Once you get to the corners, you will need to work multiple joins (double or triple - anything larger is too bulky and unsightly). Here is how they work:
Make your K-tbl the same way you would do for a single join, but do NOT drop both stitches from the needle
In fact, drop only the first stitch (which corresponded to an edge stitch) and keep the second one (the selvedge stitch) on the needle

Turn work, knit a RS row, and on the next WS row, knit the last stitch together with the same selvedge stitch you kept on the needle.

If you are going to work a triple join, repeat the last two steps again (drop only the first stitch, knit another two rows, make one more join in yet the same selvedge stitch).

Drop the stitches off the needle, and here you have a double join : 4 edge row stitches joined to a single selvedge stitch.
Turning the corner thus is achieved through a combination of double and triple joins at the corners. Exactly how many and how they are distributed depends heavily on how big the border is and your personal taste and gauge.

As a general rule, a medium edge (10-20 sts) such as the Aspen Leaf we use will need 6-8 DJ and 1 TJ per corner, and a wide edge, such as the Barege/Aspen we use on the KALendar (21 to 30 sts) will need 8 DJ and 1-4 TJ. Those are numbers quoted from Jane Sowerby's Victorian Lace Today, and I find them to be very accurate.

We will stop our tutorial here for now. Our fourth issue, which will come out as soon as I can manage, will deal with the math aspects:  calculating your corner joins, and adjusting the join count to make your pattern seamlessly perfect. I have the worksheet ready to go, finally! The last and fifth issue will deal a little bit with the finishing part: grafting both sides together and such.

So when is the actual border instructions coming out?
I have began writing the actual border instructions, but they will be very bare and tailored to the stitch counts in the pattern, therefore if you did some variations, you will need the worksheet and the tutorial to figure it out. I have a head start on my own border, and I know it is going to take me a very, very long time to finish!

Future KAL plans
Some of you have asked... and yes, there are some plans for a 2011 issue! With some differences: new theme, a smaller sized shawl, and a shorter duration of the KAL since a lot of you seem to fizzle around halfway through it. Hopefully a better yardage estimate but who knows... why missing the fun of scrambling for yarn in the last minute?
There is a good chance however that a new KAL won't start until February or March, to allow me to finish the 2010 pattern version, catch up with my horribly backlogged knitting and designing, and maybe, some fun knitting of my own! This is being very intense, compounded by two patterns that are on deadline right now.
However, we can talk about it and plan about it well before hand. Once the edge issues are all done, we can start discussing the theme and some other details. In fact, I would like to do a small online survey to see what you have liked best, in order to maximize the fun!!!

Wednesday, November 10, 2010

On the Edge: Answering the Million Dollar Question

which is... Do I have enough yardage to finish my shawl???
First, some snowflake spoilers. This is what December looks like. 
 And THIS is one of December's motifs with a nice, wide edge, knitted on that oddball blue Jaeger Trinity DK I showed you a couple of weeks ago. Awe-inspiring, how simple knitting can acquire the finesse of a heirloom with a simple border. And this is also a preview of my upcoming baby wrap/shawl which will be part of the KnitPicks IDP program pretty soon! Any of you have a special little one coming for Christmas, or want to make a special shawl for a treasured friend? I will be wanting test knitters soon!

First, a little musing about edges.

1. Edges take a lot of yardage. They are thin, but they are very long, and before you know it, you actually had to cover a lot of distance to make an edge all around a border. I have learned the hard way that a nice sized edge can take anywhere from a 30% to 100% of the yardage of a center panel, even more if we are talking about epic-sized borders.

2. The bigger the edge, the most yardage it proportionally takes. That is because a large edge takes a lot more to turn the corners. A narrow 12-row edge will take proportionately less repeats to turn the corner than a large edge with the same 12 rows. Therefore, an edge half the size will not take half the yarn to be completed, it will actually take less.

3. Because corners must be turned... Different edges use different techniques to turn corners. Edges that are picked up and knitted from the center out often need a specific border chart, which has unpaired increases or mitered increases to turn the corners. Some shawls knit the edge separately and sew it on, gathering at the edges. With sideways-knit edges, there are two options: short rows, and multiple joins. I will be using the multiple joins method, where the edge stitches are knitted on as you go to stitches from the cast on/off edge or picked up from the sides. At the corners, the center panel stitches are joined with the edges more than one time per stitch, forming the fanning effect that allows for a gentle, curving edge. This technique is easy and adaptable, and very apt to fudging without having to deal with fickle corner charts or wrap-and-turns. This is the technique I will be teaching you in this sort of extended tutorial, and we will apply it to our dishcloth and later to the shawl.

But first, the questions you have all been fretting about: Do I have enough yardage to finish the shawl? And what kind of edge should I make?

Accurate Yardage Calculation
Unfortunately, a good yardage estimate takes a little elbow grease. However, unless you have a plentiful supply of yarn, and given all the variation afforded by yarn, needle size and personal gauge, it is really worth it to invest a couple of hours doing this. Specially since you don't want to find that after days or weeks of making a border, you are a dozen yards short!


we start with a swatch
First, make a swatch with the same yarn and needles you plan to use. Make 2-3 short repeats of the edge in question. Do not cast off. Cut the yarn tails short. 


 and yes, you need a pattern for that. Here is the Aspen Leaf Edge, which we will use for the dishcloth, and also as the narrow edge portion for the shawl. For sample purposes, work the last stitch of the WS rows as a knit.

Now, find a nice cushy surface, like a carpeted area, a mattress, a couch that is not too soft,  an ironing board, or, like me, your trusty blocking foam tiles. Using a measuring device such as a tape or yardsticks, stick two sturdy T-pins or large pins  half a yard apart, (or 50 cm apart for metric folks).
The high tech yardage measure gizmo
Now, take your sample off the needles. Tie the yarn end to one of the T-pins and unravel the yarn, gently s making a loop between the two pins, as shown.
My pretty sample all unraveled
 Since I placed my pins half a yard apart, each complete loop is one yard. I completed 12 loops for two repeats, or 6 yards per repeat. I used the expanded border, and I think the narrow border will probably need about half as much yarn or even less. But it is best if you do the math yourself with your own yard and needles!

So now we only need to know how many repeats of the edge we will need to complete the border, and multiply it by our calculated yardage per repeat, and voila! a pretty accurate estimate.

My initial calculations show that, if you followed the shawl instructions without adding or deleting rows, you will need:
- About 138 reps of the narrow edge x 3 yd/rep = 414 yards
- About 141 reps of the wide edge x 6 yd/rep = 846 yards (wowza! that is as much as I have used in the center panel! I told ya!)
That, again, is an estimation for MY yarn, using MY needles, with MY personal gauge, for MY shawl. I suspect the yardage is probably less using the narrow edge so I really encourage you to do your own calculations. 

Math, math
The calculation of the actual number of reps needed for your shawl does take a bit of math and a bit of fudging. There is no proven-and-tried method. You will have to use the worksheets, and again, a little elbow grease. I will release the worksheets soon enough, so for now work on your swatch and your yardage-per-repeat.


And just to make you jealous, look at this tour de force: Kate from Dragonfly fibers labored hard to try to match my Cayenne dragon lace. Which was a one-off colorway. Eventually, I looked at all her yarn photos (it was so hard! she has so many lovely colors) and I found another colorway called Mad Love that was very, very close. She dyed one mother of all skeins for me, and here is, 2500 yards of soft merino lace goodness. If it is not the twin of my skein, it certainly is its sister! So now I can make a lush, lovely wide border which will help balance the occasional pulling of the edges in some clues.

Next: The infamous worksheets. Get out your calculator, a pencil and plenty of erasers for the next frogblog edition.

Saturday, November 6, 2010

December approaches!


That's right, that is what approaching December looks like in lovely Tucson, Arizona, where I spent a few days attending a conference.
Needless to say, during the most boring part of the presentations, there was much knitting done (which I rationalize saying I am a "tactile learner" and I learn best when my hands are busy - my coworkers bought it).  In fact I knit so much I have made back some of the time i wasted setting up the new computer. We are in great shape and we will wear our lovely shawls to Christmas parties and give them as heirloom gifts and everybody will oooh and ahhh at them, by golly.

December Release
December clue was back from unfailingly efficient Kate with a bunch of corrections, and I finished knitting through the clue, and it is ready to come out!
When? - Monday, November 8th. 2 days from now!!!
I hope you love it. I am besotted with the clue, so much I plan to make a sweet little pattern around it, a baby christening blanket....
It is a longish clue, matching the January clue to form the border of the shawl, and it is a cinch to knit.

Border Wars
After making a very, very large swatch with the projected border, I had to sit down and rethink the whole process. The border I initially chose is very lovely, not difficult, however the background lace portion refused to become mindless knitting and i found myself tinking a few more times I would like. I changed the background lace to a very similar but much easier one (lace on one side only, 4 rows), and I changed the fagotting portions a little, and it did look quite flat. I ended up throwing a few purl stitches to give it a little contrast and structure, and I have now a pretty satisfying result:
Border swatch in Frog Tree Pima Cotton (sportweight) in US#5 needles
 

The Aspen Leaf with Barege Pattern and two fagotting rows.
- Really easy to learn,  really easy to read so you don't have to tote your charts around.
- Easily expandable. Here I show it with two repeats of the Barege pattern.
- Back rows with minimal lace work, only the fagotting.
Hopefully this will ease the fatigue of the border and help you speed your way around the shawl!

Mini-Pattern Launch! the Fancy Schmancy Dishcloth
Fancy Schmancy Dishcloth
  Our little Fancy Schmancy pattern can be used as a dishcloth, or maybe a coaster, basket liner, or little table center, depending on the size made.
Dig yarn and needles out of your stash
I made the sample using Coats & Clark Creme de la Creme Cotton (very similar to Sugar & Cream cotton) - a rough, workhorse cotton. The contrasting color was made on Knit Picks Comfy Sport, a cotton/acrylic mix. Use whatever you have in your stash, some leftover cotton works fine. You will probably need two balls of Sugar and Cream, or about 200 yd/4oz of cotton. I used US#5, but Comfy is a sport weight and you will probably need to use US#7. You will end up with a sizable cloth, I warn you!
Get started! The center square
Now that you have assembled the yarn, here comes the fun part.
Think up a number between 20 and 30.
Cast on that many stitches on your chosen needles, using a provisional cast on. Any  kind will do.
Provisional cast on using a blind cast-on method

Knit a square in garter stitch (just keep knitting until you have a perfectly square shape). Put stitches on hold and break the yarn.
A test square: 20 st x 36 rws
 Your test square will be different from everybody else's, and your number of rows and stitches will depend on your gauge and the number you started with. Don't try to make one just like mine! The exercise is all about learning to fit a border into any number of edge stitches!
You don't have to make just a garter square, you can use your favorite dishcloth design. Just make sure, for now, that the edges are all done in garter stitch.

In the next few days/weeks, I will release slowly the rest of the steps you need to know. Hopefully, by the end of the exercise, you will all know how to add a perfect border to anything, and more specifically to your KALendar shawl.

A parting thought...


Zen Yarn Garden Sock Club: Superwash Merino in colorway Bryophyte.
I signed up for the club before the frogputer went down. Honest.